
Thank you for reading our post, please rate this article at the end.
Reading Time: 8 minutesLast Updated on April 12, 2026 by Paul Clayton
Table of Contents
How Often Should You Grease Travel Trailer Wheel Bearings?
Key Takeaways
-
- Standard Service Intervals: Generally, inspect and grease wheel bearings once a year or every 10,000 miles, whichever occurs first.
- Wheel Size Matters: Smaller wheels spin faster and experience more stress; they may require repacking as often as every 2,000 miles.
- Environmental Impact: Maintenance should be performed immediately if the trailer is exposed to heavy loads, off-road conditions, or water-logged axles (e.g., backing a boat trailer into water).
- Warning Signs:
- Noise: Listen for unusual chirping, growling, or grinding sounds.
- Heat: After driving 5–10 miles, touch the wheel hubs; if they are too hot to hold, the bearings are likely failing or under-lubricated.
- Movement: When jacked up, a wheel should have no more than 1/8 inch of side-to-side play.
- DIY vs. Professional: While mechanics charge per axle, owners can do this at home with basic mechanical skills and tools like a torque wrench, floor jack, and high-temperature grease.
- Serviceable vs. Sealed: Some modern trailers have factory-sealed units that cannot be greased and must be replaced entirely if they fail, though these typically last up to 150,000 miles.
The frequency of greasing travel trailer wheel bearings is a critical maintenance practice that helps ensure the longevity and efficient performance of your trailer.
However, this can vary depending on the travel trailer type, the wheel bearings used, and the conditions under which the trailer is typically used. In difficult situations, more frequent maintenance may be necessary. Therefore, understanding how often to grease travel trailer wheel bearings can significantly impact the  safety and functionality of your trailer.
The wheel bearings are a critical component of the trailer. This is because they are required to support the trailer’s weight. They ensure that the wheels turn.
When properly maintained, they ensure the wheels spin freely. This occurs without excessive friction on the trailer axle.
When neglected, the wheel bearing may leak and deteriorate. Foreign objects, such as dirt, can contaminate bearings, potentially leading to assembly failure. In such a case, it is very easy for the axle and the wheel to detach.
- Today’s Best Pop-Up Campers
- New vs. Used RV: Navigating the Price Trends
- Can You Rent an RV for a Year?
Frequently Asked Questions
How often do I realistically need to grease my wheel bearings?
For most standard trailers, you should inspect and lubricate the bearings once a year or every 10,000 miles. However, if your trailer has smaller wheels, you may need to service them more frequently, such as every 2,000 miles, because smaller tires spin faster and generate more heat and stress.
What are the warning signs that my bearings are failing?
The most common signs include:
-
Unusual Noise: Listen for growling, chirping, or grinding sounds coming from the wheels.
-
Excessive Heat: If the wheel hub is too hot to touch after a short drive (5–10 miles), the bearing is likely failing.
-
Looseness: If you jack up the trailer and the wheel has more than 1/8 inch of side-to-side “play” or wobbles when spun.
Do I need to grease my bearings after driving through water? Yes.
Even a high-quality seal cannot withstand water pressure. If your axles become water-logged—common when launching boats or driving through flooded areas—you should have the bearings cleaned and repacked as soon as possible to prevent rust and contamination.
Can I grease the bearings myself, or do I need a professional?
You can do it yourself if you have basic mechanical skills. You will need a few specific tools, including a wheel jack, a torque wrench, high-temperature grease, and clean rags. While a professional mechanic charges per axle, DIY maintenance can significantly lower your maintenance costs.
5. What is the difference between serviceable and factory-sealed bearings?
-
Serviceable bearings can be removed, cleaned, inspected, and repacked with fresh grease on a regular schedule.
-
Factory-sealed units cannot be serviced. While they often last longer (up to 150,000 miles), the entire assembly must be replaced if the seal fails or an issue arises.
How Often Should You Grease Travel Trailer Wheel Bearings?
The maintenance of the wheel bearing usually depends on the kind of trailer you are using. You also have to consider:
- The load weight on average
- The wheel size
It is recommended that the wheel bearings be inspected and greased at least once per season. Another recommendation is to grease every 10,000 miles. However, trailers with smaller wheels will need repacking after 2,000 miles.
When the tires are small, the wheels tend to spin faster, which stresses the bearings. You can determine how often you need to grease based on how you use the trailer and where you have been.
This video has been included to clarify the topic. Credit goes to DnSAdventures
Considerations
Usually, greasing is charged per axle by professional mechanics. However, this can be done at home at a much lower cost. You will need to understand the basics of the greasing process and purchase all required parts.
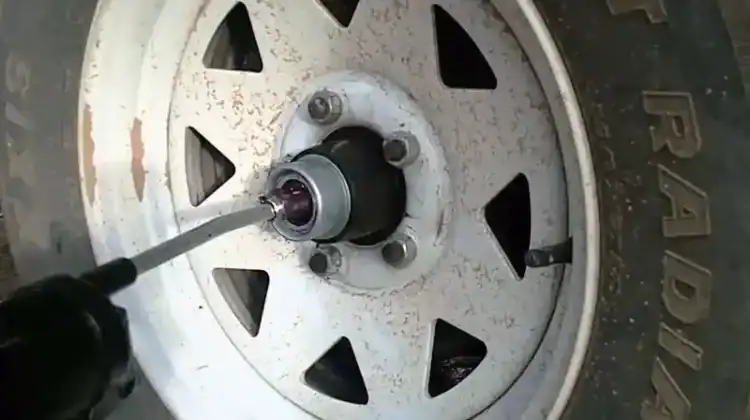
You should have basic mechanical skills to do it right. You will need a wheel jack, rags, a hammer, a torque wrench, and high-temperature grease. You can also consider using a bearing packer.
This will usually give a relatively clean job, but it is not necessary.
Identification
Wheel bearings have not changed over time. Greasing is not a challenging task either. However, before you make it a DIY project, you should have a service manual for the trailer. The manual should include instructions for greasing.
Ensure your wheels are correctly torqued. Make sure that you have the right kind of trailer jack. To do it well, ensure the tires on the opposite side are jacked. This ensures safety since you have to work under the trailer.
Warning
If your trailer has been exposed to heavy loads, water-logged axles during towing, or off-road use, you need to maintain it. After being in extreme situations, you should inspect the trailer wheel bearings as soon as possible to prevent future issues.
You need to appreciate that even a good seal cannot withstand water, especially when it continues to exert pressure. If you drive through water, you should have the bearings repacked after cleaning, particularly if they are serviceable. For factory-installed units, monitor for any premature failures.
Some manufacturers do not grease the bearings before delivering the vehicle to the dealer. It is essential to test your wheel bearings to find out whether there is excessive friction. To do this, you only need to touch the tires once you have used it.
A hot tire surface indicates a potential lubrication issue.
Wheel bearings hold the wheels in place, and they are critical. It is essential to ensure that the bearings are in good condition and perform as intended. Wheel bearings are not complicated and are usually made of steel.
They are designed to withstand up to 100,000 miles or more, especially when properly maintained. The bearings support your vehicle’s weight.
To function well, they should be perfect at all times. They need a lot of grease for lubrication and protection. A seal is used to ensure that the grease stays in place.
The seal is also needed to protect it from dirt and water. If the seal leaks, then you will have serious issues. This is because your grease will be contaminated. It will cause the bearings to overheat and ultimately fail.
The first sign
You will know that there is trouble from the noise that will come from the wheels. The noise is often unusual. You could notice a cyclic, rumbling, growling, or even chirping sound. This noise may increase at some speeds, while at others it may disappear altogether.
When you notice the noise, do not move the trailer. Have a professional inspect your bearings. This is often done by lifting the trailer and then checking the wheels.
Some assemblies are factory-sealed. This means that you cannot service them, but they can be replaced. Others are not sealed and can be serviced according to a schedule.
In most cases, the bearings need to be removed for cleaning and inspection. If they appear to be in perfect shape, they can be reinstalled. However, if they are in poor condition, they must be replaced. They can be packed in grease, and then another seal can be installed.
If you own a trailer with a factory-sealed wheel bearing assembly, you will need to replace the entire assembly if any issue arises. The parts can be pretty costly, but the best part is that they usually last up to 150,000 miles when the seal remains intact.
Manufacturer recommendations
When your wheel bearings are not factory-sealed, the recommended service interval is about 30,000 miles.
If you are a trailer owner, you should never forget to inspect the wheel bearings. They may require more frequent service than other types of vehicles. Do not allow the bearings to be in poor condition or to rust.
Assess the surrounding climatic conditions, monitor any changes in trailer operation, and take the necessary precautions.
What to do if the bearings fail
In some cases, the wheel bearings can actually fail. The wheel can fall off your trailer, which can be detrimental. To avoid this, it is essential to find out as much as you can about your trailer’s bearings.
Find out whether they can be serviced and the recommended service interval. It is essential to monitor early warning signs, especially after exposure to extreme conditions.
Checking the wheel bearings
The last thing anybody wants is to be stranded on the road with a trailer that has been disabled. Before you start, you should check the trailer’s wheel bearings and braking system.
The bearings are usually neglected because they are not visible. A damaged, worn, or loose bearing is the primary cause of brake failure to engage. To maintain the trailer, check the bearings regularly. To do this, you will need to jack up the trailer to secure it.
- You need to check your wheels for looseness. Side-to-side looseness can be severe. The wheel should have very little room to play. This should be approximately 1/8 inch or less. If you notice a wobbly or loose spin, have the bearings serviced and replaced.
- You should also run a noise check. This can be done by asking someone to listen from the curbside and the driver’s side as you tow past at around 25mph. They should be keen to click, grind, squeak, or make other sounds emanating from the wheels. If there is any noise, check whether a bearing is bad and needs lubrication.

- Checking for heat: Tow your trailer a short distance. This should be around 5 to 10 miles at normal speeds. Park it and then touch the wheel hubs. If you find it too hot to hold, you may need a replacement or have it lubricated. The bearing may be faulty and require replacement, or it may need greasing. It could also be because the bearing does not have enough room.
Final Thoughts
The frequency of greasing travel trailer wheel bearings is critical to maintenance and safety. The general rule of thumb is to grease travel-trailer wheel bearings every 10,000 to 12,000 miles, or once a year, whichever comes first.
However, it’s essential to understand that this frequency can vary with factors such as the trailer’s age, wheel-bearing quality, and operating conditions. For instance, trailers used in harsh or off-road conditions may require more frequent greasing.
Therefore, it’s always a good idea to inspect your wheel bearings regularly and consult a professional if you’re unsure. While the answer to “How Often Grease Travel Trailer Wheel Bearings?” can vary, regular maintenance remains crucial to ensuring the longevity and safety of your travel trailer.
You should never use different types of grease thickeners simultaneously. Please do not mix them. Axles use a thickener, that is, a lithium complex. When you combine the grease with polyuria soap, clay, calcium, or barium, adverse effects may occur. The grease may actually harden or separate. It can also become acidic, thereby posing damage and other hazards to your bearings.


