
Thank you for reading our post, please rate this article at the end.
Reading Time: 10 minutesLast Updated on February 12, 2026 by Paul Clayton
Table of Contents
The Ultimate Guide to RV Leveling: Techniques, Safety, and Best Practices
Key Takeaways
-
- Mechanical Necessity: Leveling is essential for the gravity-fed cooling process in absorption refrigerators; operating them on an incline can cause permanent damage or a fire.
- Structural Integrity: An unlevel rig places torsional stress on the chassis, which can cause slide-outs to bind, doors to misalign, and seals to fail.
- Safety First: Always chock your wheels before unhitching. Never lift the rear wheels of a motorhome off the ground, as this is where the parking brake is located.
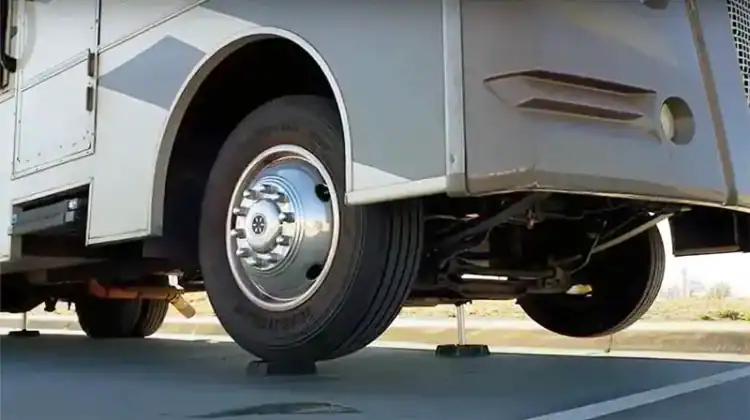
- The “Golden Rule” of Jacks: Stabilizer jacks are for reducing bounce, not for lifting weight. Use leveling blocks under tires for height and tongue jacks/landing gear for front-to-back leveling.
- Sensor Accuracy: Your fresh, grey, and black water tank sensors require a level plane to provide accurate volume readings.
- Operational Sequence: Most manufacturers recommend leveling and stabilizing the rig before extending slide-outs to ensure the frame is perfectly aligned.
- Site Selection: Proper leveling starts with scouting; choosing a naturally flat spot and parking “nose-down” on slopes significantly reduces the work required.
For many outdoor enthusiasts, the dream of the open road is often interrupted by the reality of a sloped campsite. Leveling an RV or travel trailer can initially feel like a “cringe-worthy” chore, an arduous task that stands between you and your weekend getaway. However, as experienced RVers eventually learn, leveling is not just about aesthetics or stopping your peas from rolling off your dinner plate; it is a fundamental requirement for the mechanical health and safety of your rig.
- Today’s Best Pop-Up Campers
- New vs. Used RV: Navigating the Price Trends
- Can You Rent an RV for a Year?
Whether you are operating a motorized coach or a towable travel trailer, achieving a perfect (or near-perfect) level is a skill that saves money, prevents damage, and ensures a comfortable stay. This comprehensive guide combines expert tips and technical insights to help you master the art of the level.
Why Leveling is Non-Negotiable
It is tempting to skip leveling after a long day of driving, especially if the site “looks flat enough.” However, an unlevel RV is a ticking time bomb for several critical systems.
1. Refrigerator Longevity and Safety
Most RVs use absorption refrigerators. Unlike the compressor-based fridge in your home, an absorption fridge uses a gravity-based cooling process involving ammonia, water, and hydrogen.
-
The Science: A heat source (propane or electric) turns the liquid into a vapor, which then condenses and flows back down through a series of coils.
-
The Risk: If the unit is not level, the liquid coolant cannot flow properly. It pools in the coils, causing the unit to overheat. This can lead to permanent cooling failure or, in extreme cases, an RV fire.
2. Slide-out Integrity
Slide-outs are heavy mechanical components designed to move on a specific plane. If the chassis is twisted or tilted, the slide-out frame can bind. This puts immense strain on the motors and can cause the slide to get stuck or leak during a rainstorm.
3. Structural and Chassis Stress
RVs are designed to distribute their weight evenly across the frame when level. Parking at a steep angle places “torsional stress” on the chassis. Over time, this can lead to cracks in fiberglass, doors that won’t latch properly, and windows that lose their seal.
4. Precision of Tank Sensors
RV tank sensors (Grey, Black, and Fresh) are often simple probes located at specific heights in the tank. If the rig is tilted toward the sensor, it may read “Full” even when it is half-empty. If tilted away, you might overflow your grey tank because the sensor never “saw” the water rising.
5. Personal Comfort
Living in a tilted house is physically exhausting. It affects your sleep, causes dizziness, and makes simple tasks like cooking or walking across the floor feel unnatural.
Essential Leveling Toolkit
Before you head to the campground, ensure you have these tools in your storage bay:
| Tool | Purpose | Recommendation |
| Leveling Blocks | Raise the wheels to achieve side-to-side balance. | Tri-Lynx or Andersen Levelers |
| Wheel Chocks | Prevent the rig from rolling during or after leveling. | Rubber or heavy-duty plastic chocks |
| Bubble Levels | Visual indicator of how far “off” the rig is. | Large 2-foot carpenter level or stick-ons |
| Jack Pads | Prevent stabilizers/jacks from sinking into the ground. | Wooden 2×10 blocks or heavy-duty rubber pads |
| Wireless Systems | Digital leveling via smartphone apps. | LevelMatePRO |
Stage 1: Campground Selection and Preparation
Leveling begins before you even put the vehicle in park. Your choice of parking spot determines how much “work” you’ll have to do.
-
Scout the Site: Look for the flattest area within your designated spot. Avoid areas with large tree roots, soft sand, or significant dips.
-
Clear the Path: Remove large rocks, fallen branches, or debris that could sit under your tires or jacks.
-
Check for Room: Ensure you have enough space to drive the trailer forward or backward onto your leveling blocks. You cannot level a stationary trailer side-to-side without moving it.
-
The “Nose Down” Rule: If possible, park the RV so the front end faces downward on a slope. It is safer and easier to lift the front of a rig than the rear, as the rear wheels provide the primary braking/locking force.
Stage 2: Side-to-Side Leveling (The “Hard” Part)
Side-to-side leveling must be done before you unhitch your travel trailer. Because you use the wheels to gain height, the tow vehicle must move the trailer onto the blocks.
Step-by-Step Side-to-Side Process:

-
Measure the Incline: Place your level across the tongue of the trailer or on the floor inside the doorway. Determine which side is “low.”
-
Position the Blocks: Place your leveling blocks (building blocks or sloped wedges) directly in front of or behind the tires on the low side.
-
The Ascent: Slowly drive the trailer onto the blocks. If you are using “Lego” style blocks, ensure the tire is centered on the block and not hanging off the edge, which can cause tire sidewall damage.
-
Re-Check: Once on the blocks, check the level again. If you are still low, add another layer of blocks and repeat.
-
Chock the Wheels: Once side-to-side level is achieved, place wheel chocks firmly against the tires on both sides. This is a critical safety step to prevent the trailer from rolling when you unhitch.
Stage 3: Front-to-Back Leveling (The “Easy” Part)
Once the side-to-side level is secured and the wheels are chocked, you can focus on the front-to-back axis. This is achieved using the tongue jack (for trailers) or landing gear (for 5th wheels).
-
Prepare the Base: Place a jack pad or wooden blocks under the tongue jack. This prevents the jack from “diving” into soft earth or hot asphalt.
-
Unhitch: Disconnect the trailer from the tow vehicle and move the vehicle out of the way.
-
Adjust Height: Use the manual crank or electric motor on your tongue jack to raise or lower the front of the trailer.
-
Verify: Check your level by placing it front-to-back on the floor or the exterior frame. Adjust until the bubble is dead center.
Stage 4: Stabilization vs. Leveling
One of the most common “rookie mistakes” in RVing is attempting to level the rig using the stabilizer jacks.
WARNING: Stabilizer jacks are designed to stop the “bouncing” motion of the RV when people walk inside. They are not designed to lift the weight of the vehicle. Attempting to level with them can bend the jacks or twist the RV frame.
How to Stabilize Properly:
-
Once the rig is level (using blocks and the tongue jack), lower the four corner stabilizers.
-
Place wood planks or pads under each stabilizer foot.
-
Lower them until they make firm contact with the ground and give them an extra half-turn (if manual). They should be snug but not lift the trailer off its tires.
Choosing Your Leveling Blocks

When shopping for levelers, you will encounter two primary designs. Each has its own set of pros and cons.
1. Building Block Levelers (Stackable)
These look like giant plastic Lego bricks.
-
Pros: Highly adjustable; you can stack them as high as needed (within manufacturer limits); they double as pads for your jacks.
-
Cons: Require more “trial and error” to get the height right; can be difficult to clean when mud gets in the honeycomb structure.
2. Sloped/Curved Levelers (The Andersen Style)
These are wedge-shaped or “crescent” shaped levelers.
-
Pros: Extremely fast; you simply drive up the curve until the level is perfect and then kick a chock underneath. No stacking or guessing required.
-
Cons: They have a maximum lift height (usually 3–4 inches); they don’t work well on tandem axles with very tight tire spacing.
Width and Weight Capacity
Regardless of the style, ensure the leveler is wider than your tire tread. If the tire hangs over the edge, the tire’s internal steel belts can be overstressed, leading to a blowout later on the highway. Always check the weight rating to ensure the blocks can handle the GVWR (Gross Vehicle Weight Rating) of your specific rig.
Best Practices for Safety and Ease
-
Avoid Slick Surfaces: Never attempt to level on ice or wet, mossy pavement. The blocks can slide out like a bar of soap when the tire pressure hits them.
-
The “Spotter” System: Leveling is a two-person job. The driver focuses on steady throttle and braking, while the spotter monitors the tires’ position on the blocks and watches the bubble levels.
-
Follow the Manual: Some modern Class A and Class C motorhomes have specific leveling sequences (e.g., “Slides out first, then level” vs. “Level first, then slides out”). Always defer to your specific manufacturer’s manual.
-
Check the Fridge Again: After you are fully set up, do one final check of the level inside the refrigerator. If the fridge is level, your coolant will flow, and your food will stay cold.
Frequently Asked Questions
Q: Should I level my RV with the slides out?
A: Generally, no. Most manufacturers recommend leveling and stabilizing first to ensure the frame is rigid before moving the heavy slides. However, some high-end motorhomes with hydraulic leveling systems have different protocols. Check your manual!
Q: How many blocks is “too many”?
A: Most plastic blocks shouldn’t be stacked more than 3 or 4 inches high. If a site is so unlevel that you need a foot of blocks, it is safer to move to a different site. High stacks become unstable and can collapse or cause the RV to tip.
Q: Do I need to level the RV for storage?
A: If the refrigerator is turned off, the RV does not strictly need to be level for storage. However, keeping it level prevents water from pooling on the roof, which can lead to seam leaks over time. It also prevents the tires from taking on “flat spots” unevenly.
Leveling is the foundation of a successful camping trip. By taking the extra 10 minutes to ensure your “home on wheels” is straight and stable, you protect your mechanical systems, keep yourself safe, and—most importantly—have a comfortable place to relax at the end of the day.
Manage Your RV Leveling with Our 3-Step Checklist
Checklist 1: The Travel Trailer (Manual or Electric Jack)
Best for: Bumper-pull trailers that require you to manage the tow-vehicle connection.
-
Survey & Entry: Pull into the site and check the side-to-side level with your bubble or wireless level.
-
Side-to-Side Leveling: * Place blocks/wedges on the low side (in front of or behind tires).
-
Slowly pull/back the trailer onto the blocks until level.
-
-
Secure the Rig: Set the parking brake on the tow vehicle and chock the trailer wheels (both sides).
-
Unhitch: * Disconnect weight distribution bars (if applicable) and safety chains.
-
Place a jack pad/wood block under the Crank or Electric Tongue Jack.
-
Raise the jack until the coupler clears the hitch ball; pull the tow vehicle away.
-
-
Front-to-Back Leveling: Adjust the tongue jack (crank or power) until the front-to-back bubble is centered.
-
Stabilize: Lower all four stabilizer jacks onto pads. Stop as soon as they are snug—do not lift the trailer.
-
Slides: Verify interior clearance and extend slides.
Checklist 2: The 5th Wheel (Electric Levelers)
Best for: Large towables that use landing gear and rear stabilizers.
-
Initial Positioning: Spot the low side and place leveling blocks under those tires.
-
Side-to-Side Leveling: Back the 5th wheel onto the blocks.
-
Chock Wheels: Use heavy-duty chocks. 5th wheels have a high center of gravity; do not skip this.
-
Disconnect: * Lower the Electric Landing Gear (front jacks) onto pads until they take the weight off the truck bed.
-
Disconnect the 5th wheel hitch and electrical cord. Pull the truck forward.
-
-
Front-to-Back Leveling: Use the electric landing gear controls to raise/lower the nose until level.
-
Rear Stabilization: Lower the rear electric stabilizers.
-
Note: If you have an “Auto-Level” system, simply hit “Auto-Level” after the truck is clear.
-
-
Slides: Check that the 5th wheel is stable and level to prevent the frame from twisting, then extend the slides.
Checklist 3: The Class A Motorhome (Hydraulic/Auto-Leveling)
Best for: Drivable rigs where the leveling system is integrated into the chassis.
-
Final Park: Find the flattest spot. Ensure the front wheels do not hang over a “drop-off” (keep the front tires as close to the ground as possible).
-
Engine/Brake Status: * Engage the Parking Brake.
-
Keep the engine running (many hydraulic systems require the alternator’s voltage to operate effectively).
-
-
Deploy Levelers: * Place heavy-duty jack pads under the hydraulic jacks.
-
Use the Auto-Level function or manual joystick controls.
-
Warning: Never lift the rear wheels off the ground (this is where your parking brake is). If the site is too steep, move the rig.
-
-
Verify Level: Check the fridge or the floor to ensure the system performed correctly.
-
Slides: * Check Manufacturer Specs: Most Class A’s require you to be fully leveled before extending slides to protect the massive slide motors.
-
Visually check for trees or power poles outside before extending.
-
-
Engine Off: Once level and slides are out, turn off the engine and connect to shore power.
Pro-Tip for All Rigs: The “Pantry Test”
After you think you are level, go inside and open a cabinet or the bathroom door halfway. If the door swings open or shut on its own, you aren’t quite there yet!
Final Thoughts
-
The Foundation of Camping: Leveling is more than a convenience; it is the foundation of a safe and successful RV trip that protects your high-value investment.
-
Tooling Up: Investing in the right gear—such as stackable blocks, curved levelers, and jack pads—turns an arduous chore into a quick, repeatable routine.
-
Customized Approach: Whether you are driving a Class A motorhome or towing a travel trailer, following a rig-specific checklist ensures no safety steps are missed (such as chocking or setting the parking brakes).
-
Long-term Health: Consistent leveling practices prevent long-term structural wear and tear, ensuring your “home on wheels” remains roadworthy for years to come.
-
The Final Check: Always perform a “real-world” test, such as the interior door-swing test, to verify your level before settling in for the night.
Here is your RV Leveling Quick-Reference Card. Copy and paste for printing. This size is ideal for high visibility and fits perfectly inside a standard storage bin or laminated on the inside of your utility bay door.
RV LEVELING SAFETY & ESSENTIALS (5×7)
The Foundation of a Safe & Damage-Free Trip
THE “NEVER” LIST (CRITICAL)
-
NO LIFTING WITH STABILIZERS: These are for vibration only. Using them to lift weights will bend the jacks or twist the RV frame.
-
NO FLOATING REAR TIRES: (Motorhomes) Never lift rear wheels off the ground; you will lose your parking brake and the rig will roll.
-
NO UNLEVEL FRIDGES: Absorption fridges must be level to circulate coolant. Failure to level can cause a fire or permanent cooling failure.
-
NO SLIDES UNTIL LEVEL: To prevent motor binding and seal leaks, achieve a perfect level before extending slides.
ARRIVAL SEQUENCE (TOWABLES)
-
SIDE-TO-SIDE: Use blocks/wedges under tires on the low side.
-
CHOCK: Place heavy-duty chocks on both sides of the tires.
-
UNHITCH: Disconnect from the tow vehicle only after chocking.
-
FRONT-TO-BACK: Use the tongue jack or landing gear to level.
-
STABILIZE: Lower corner jacks onto pads until snug (not lifting).
MOTORHOME SEQUENCE (CLASS A/C)
-
PARK: Engage Parking Brake. Keep the engine running for hydraulics.
-
PADS: Place jack pads under all hydraulic feet to prevent sinking.
-
LEVEL: Run Auto-Level. Verify all tires maintain ground contact.
-
SLIDES: Confirm exterior clearance and extend. Turn the engine OFF.
THE “DONE” VERIFICATION
-
THE DOOR TEST: Interior doors should stay still when half-open.
-
FRIDGE CHECK: Verify the fridge interior is level for safe operation.
-
JACK PADS: Ensure no jacks have settled or shifted into soft mud.
